Integration
In-depth knowledge
Testing and Go-live
Integrate
Brite Play
In this guide we explain everything you need for your customers to sign-up and pay using Brite Play.
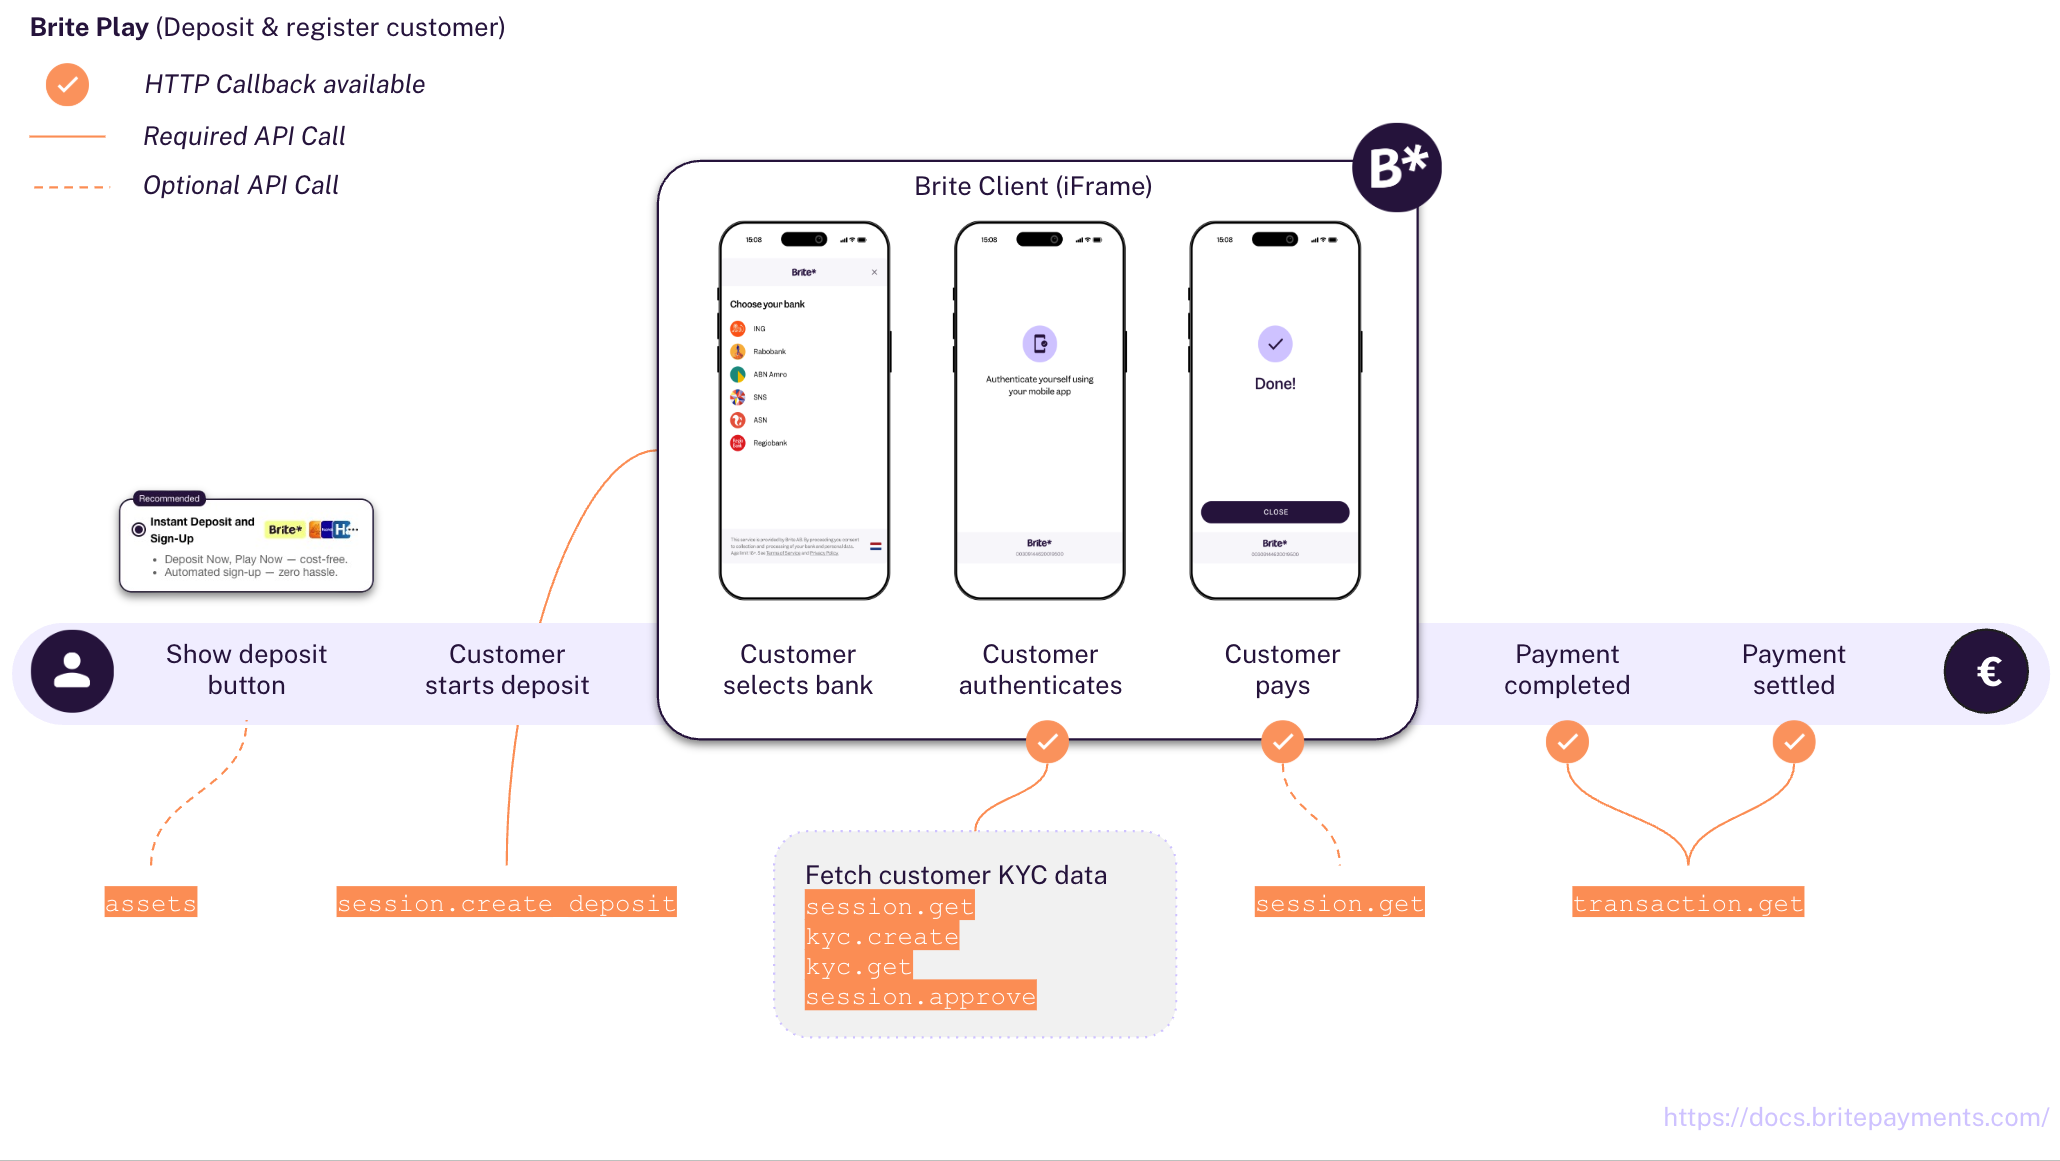
The integration consists of 7 steps depending on your use case.
-
GET /v1/assets/ -
Create a session for the payment
POST /api/merchant.authorize
POST /api/session.create_deposit Render the Brite Client on the front-end
<script>new Brite([token])<script>-
Fetch the KYC data when available
POST [callbacks[session_state=2].url]
POST /api/session.get
POST /api/kyc.create
POST /api/kyc.get
Approve or decline the session
POST /api/session.approveorPOST /api/session.reject-
POST [callbacks[session_state=12].url]
POST /api/session.get -
POST [callbacks[...].url]
POST /api/transaction.get
In step 3 you can also choose to use the provided url to redirect the customer to a Brite hosted payment page or you can render the Brite client embedded in your checkout. We recommend the embedded Brite client which allows the customer to stay on your side without getting redirected. This is an improved UX and can lead to a better conversion rate.
If you want to payout to a customer, you can follow the steps outlined for Brite Instant Payouts. If you want to refund a transaction, you can follow the steps outlined for refunds for Brite Instant Payments as the integration is the same.
Log-in for your customers
If you want to provide a login for existing customers, you can use the Brite Data Solutions - User Authentication.
Ideally, customers have already done at least 1 successful deposit (Brite Play) before they can use the fast user authentication.
1. Display Brite in your Cashier
GET /v1/assets/
At first it is important that customers recognise and choose Brite as their way to pay in your checkout. Brite provides assets which make the presentation of Brite as a payment option clear and visually beautiful for your customers!
The best way to do that is to use Brite’s assets. Find that in more detail at: Checkout UX for Brite.
2. Create a session for the payment
Merchant authorisation
POST /api/merchant.authorize
You need to authorise your access to Brite's APIs. For that follow the steps outlined in Merchant Authorisation. As a result, you have an access_token which you add to your requests to the Brite APIs.
Authorization: Bearer <access_token>
Request to create a session
POST /api/session.create_deposit
The request includes several data points, not all of which are required. However, we highly recommend adding them as outlined in the sample request here. Providing the data can improve the overall UX for the customer and also your own as it allows you to identify and relate payments better with orders in your system.
					POST /api/session.create_deposit HTTP/1.1
Host: sandbox.britepaymentgroup.com
Content-Type: application/json
Authorization: Bearer <YOUR_TOKEN>
{
  "amount": 34.56,
  "country_id": "se",
  "brand_name": "My example brand",
  "merchant_reference": "ORD-12345-ABC", // Your order id
  "locale": "sv",
  "deeplink_redirect": "myapp://open?screen=checkout&order_id=ORD-12345-ABC",
  "redirect_uri": "https://merchant.com/payment?order_id=ORD-12345-ABC",
  "callbacks": [
    {
      "url": "https://merchant.com/callback?kyc=true&order_id=ORD-12345-ABC",
      "session_state": 2 // STATE_AUTHENTICATION_COMPLETED to start the approval or rejection
    },
    {
      "url": "https://merchant.com/callback?kyc=true&order_id=ORD-12345-ABC",
      "session_state": 10 // STATE_ABORTED to go back to authentication selection
    },
    {
      "url": "https://merchant.com/callback?kyc=true&order_id=ORD-12345-ABC",
      "session_state": 11 // STATE_FAILED to go back to authentication selection
    },
    {
      "url": "https://merchant.com/callback?kyc=true&order_id=ORD-12345-ABC",
      "session_state": 12 // STATE_COMPLETED to complete the session
    },
    {
      "url": "https://merchant.com/callback/?order_id=ORD-12345-ABC",
      "transaction_state": 2 // STATE_ABORTED to go back to payment selection
    },
    {
      "url": "https://merchant.com/callback/?order_id=ORD-12345-ABC",
      "transaction_state": 3 // STATE_FAILED to go back to payment selection
    },
    {
      "url": "https://merchant.com/callback/?order_id=ORD-12345-ABC",
      "transaction_state": 5 // STATE_CREDIT to credit the customer OR ship goods
    },
    {
      "url": "https://merchant.com/callback/?order_id=ORD-12345-ABC",
      "transaction_state": 7 // STATE_DEBIT to request new payment from customer
    }
  ],
  "approval_required": true
}
Here we highlight some parameters. For a full list of all parameters check out the API reference.
approval_required: true
This flag allows you to approve and reject an going session. This means that you essentially have control over which customer can complete a payment and which not.
true, Brite accepts a /session.approve or a session.reject request with the corresponding session_id. The request has to be sent in between the session states 2 and 5.
brand_name
The brand name is visible to the customer when using Brite Payments. You should choose a recognisable and relatable brand name here for a better experience. Note that even though there is no character limitation, Brite will show 31 characters in the smallest version of the client.

deeplink_redirect - recommended for mobile apps
When the customer returns from their mobile banking app or online banking, a Brite web application is opened to handle the returning customer. Note that this is particularly the case on mobile devices. Immediately after that Brite opens the link provided in deeplink_redirect. This way, the customer is basically redirected from their bank to the deeplink_redirect. The link should point to the view in your mobile app or web page on which the customer can continue the payment process using Brite.
You should add any relevant ids to the URL so that you can identify the respective purchase/order in your system.
Example for mobile apps: myapp://open?screen=checkout&order_id=ORD-12345-AB
Example for web pages: https://merchant.com/checkout?order_id=ORD-12345-AB
If you don't provide a deeplink_redirect the Brite web application closes itself without any further redirection. This will likely open the most recent tab or browser of the customer instead of opening the merchant app and feels to the customer as if they get “stuck”. From here, they have to manually retrieve the merchant app from the apps in the background.
redirect_uri - only for redirect (hosted payment page)
When the customer completes, aborts or in other ways finishes the payment, Brite opens the link provided in redirect_uri if you use Brite via the hosted integration.
Brite opens the link once the session finishes. That is when
the customer either successfully completes the payment (
session_state: 12,STATE_COMPLETED),the payment fails for unknown reasons (
session_state: 10,STATE_ABORTED) orthe payment fails for a known reason (
session_state: 11,STATE_FAILED).
You should add any relevant ids to the URL so that you can identify the respective purchase/order in your system.
Example for mobile apps: myapp://open?screen=checkout&order_id=ORD-12345-AB
Example for web pages: https://merchant.com/checkout?order_id=ORD-12345-AB
customer_id
Brite generates unique ids for every customer who successfully passed the authentication. Brite identifies customers based on several data points. Those include bank account details which means that an identification can only happen after the customer logged into their bank account and is not available before. This means, you can get the customer_id in the details of the session or transaction once the customer authenticated or any step after that.
If you provide a Brite customer id here it ensures that only this particular customer is allowed to complete the payment. Brite will reject any other customer once they can be identified.
callbacks
It is crucial to subscribe to the callbacks to know how to process the deposit in your system. For the standard Brite Play integration you should subscribe to
Session states (session_state):
2=> to verify the customer on your end10and11=> to fetch aborted and failed sessions12=> for successfully completed sessions
Transaction states (transaction_state):
2and3=> to fetch aborted and failed transactions5=> to credit the player7=> to notify about not received transactions.
Response to create a session
					{
    "url": "https://sandbox.britepaymentgroup.com/eyJo[...]JhZTAwZDUwZiJ9",
    "token": "eyJob3N0IjogImh0dHBzOi8vc2FuZGJveC5icml0ZXBheW1lbnRncZt[...]wZiJ9",
    "id": "ag9ofmFib25lYS0xNzYyMTNyEQsSA1Nlc3Npb24Y0p6R0AEM"
}
The response contains attributes for both, the embedded integration (token) and the hosted integration (url).
url
The URL opens the Brite's hosted payment page. It allows your customers to complete the payment on the hosted payment page and then return to your checkout. We call this the redirect integration.
DO NOT render this url inside an iframe. It is meant to be opened in a new window/tab. If you want to display Brite inside an iframe use the token in combination with the Brite Client javascript.
token
The token to initiate the Brite client in your checkout. It should be shared with the client in a secure way. This allows your customers to complete the payment as an embedded experience. We call this the embedded integration.
token with your front-end
The token is meant to be shared with your client (front-end). There you should use the client.js and create a new instance of new Brite('eyJ...').
More: https://docs.britepayments.com/technical-documentation/rendering-the-brite-client/
id
The id of the session. You can store the id from this response, however, you will get the respective notifications and with those you should also be able to associate the respective orders in your system with Brite’s session and even more so important the transaction.
Embedded integration (Recommended)
The embedded integration allows your customers to complete the payment within the checkout experience in your site. In some cases, they might need to complete certain steps of the payment authentication and authorisation in their online banking, however, they will get back to your site before completing the payment.
Redirect integration
The redirect integration allows you to redirect the customer to a Brite hosted payment page. The customer completes all required steps there until they either abort, fail or complete the payment.
At the end of the flow Brite redirects the customer back to the redirect_uri that you provided as part of the session. If you choose to use this integration, you can skip the step of rendering the client on the front-end.
3. Render the client on the front-end
<script>new Brite([token])</script>
The Brite client will handle all required authentication and authorisation steps the customer needs to go through with their bank. Once those are completed, you will receive an event on the front-end that will close the client and allow you to continue to payment flow.
For integration of the Brite client see https://docs.britepayments.com/technical-documentation/rendering-the-brite-client/
4. Fetch the KYC data when available
POST [callbacks[...].url]POST /api/session.getPOST /api/kyc.createPOST /api/kyc.get
2 (STATE_AUTHENTICATION_COMPLETED). Once you received the notification, respond with a HTTP 200.
Example of a STATE_AUTHENTICATION_COMPLETED notification
					POST /callback?kyc=true&order_id=ORD-12345-ABC
{
    "merchant_id": "ag9ofmFib25lYS0xNzYyMTNyFQsSCE1lcmNoYW50GICAgID4woQKDA",
    "session_id": "ag9ofmFib25lYS0xNzYyMTNyFAsSB1Nlc3Npb24YgICAjeqInQgM",
    "session_state": 2 // STATE_AUTHENTICATION_COMPLETED
}
From here there are 2 important steps. First, fetching the session details and then fetching the KYC data.
Fetching the session details follows the general approach for handling callbacks. This means you request the session details using the session_id from the notification callback.
Request to get the session by session_id
					POST /api/session.get
{
    "id": "ag9ofmFib25lYS0xNzYyMTNyFAsSB1Nlc3Npb24YgICAjeqInQgM" // session_id
}
Response with the session details
The response contains all details for this session. However, the most important one at this step it the customer_id. It is required for the next step to fetch the KYC for the respective customer.
					{
    ...
    // customer_id is available in the response once Brite identifies the customer
    "customer_id": "ag9ofmFib25lYS0xNzYyMTNyFQsSCE1lcmNoYW50GICAgID4woQKDA"
    ...
}
Request to create the KYC based on the customer_id
					POST /api/kyc.create HTTP/1.1
Host: sandbox.britepaymentgroup.com
Content-Type: application/json
Authorization: Bearer <YOUR_TOKEN>
{
    // customer_id from the session.get response
    "customer_id": "ag9ofmFib25lYS0xNzYyMTNyFQsSCE1lcmNoYW50GICAgID4woQKDA"
}
Response to the KYC request
					{
    "id": "ag9ofmFib25lYS0xNzYyMTNyEAsSA0tZQxiAgIDtjbL4CQw"
}
id. You need this in the next step to fetch the KYC data.Request to fetch the KYC data based on the kyc_id
					POST /api/kyc.get HTTP/1.1
Host: sandbox.britepaymentgroup.com
Content-Type: application/json
Authorization: Bearer <YOUR_TOKEN>
{
    "id": "ag9ofmFib25lYS0xNzYyMTNyEAsSA0tZQxiAgIDtjbL4CQw" // id from the KYC request
}
Response with the KYC data
					{
    "firstname": "Maria",
    "created": 1744706536.0,
    "dob": "1986-03-07",
    "lastname": "Gustafsson",
    "completed": 1744706536.0,
    "country_id": "se",
    "state": 3,
    "ssn": "198603076110",
    "address": {
        "city": "Borlänge",
        "postal_code": "89640",
        "street_address": "Parkvägen 38",
        "country": "Sweden"
    },
    "customer_id": "ag9ofmFib25lYS0xNzYyMTNyFQsSCEN1c3RvbWVyGICAgM3erbwKDA",
    "id": "ag9ofmFib25lYS0xNzYyMTNyEAsSA0tZQxiAgIDt0o_zCQw"
}
The response contains the customer data. Together with the data in the session response you should now have enough data to make a sound decision to either approve or reject the ongoing session.
Verification of the customer
Which steps you take to verify the customer is obviously your choice to make. Typical checks involve firstname and lastname, dob or address.country_id. Other checks may include but are not limited to address details address.* from the KYC data and bank account details bank_account.* from the session.
5. Approve or decline the session
POST /api/session.approve or POST /api/session.reject
From the moment you received the STATE_AUTHENTICATION_COMPLETED notification there is a 5 minute window during which you can approve or reject the session. If not, Brite rejects the session automatically.
In order to approve or reject a session you simply have to call the respective endpoint with the session id.
Example of a session.reject request
					POST /api/session.reject HTTP/1.1
Host: sandbox.britepaymentgroup.com
Content-Type: application/json
Authorization: Bearer <YOUR_TOKEN>
{
    "id": "ag9ofmFib25lYS0xNzYyMTNyFAsSB1Nlc3Npb24YgICAjeqInQgM" // session_id
    "reason": "Duplicated account" // reason is only available for session.reject
}
Similar is the session approve request but it does not require a reason.
Response to a successful session reject and approve request
The response is a HTTP 200 and contains an empty object.
The session state changes once you approve or reject a session
- Approve: once the customer is ready session continues to state
5(STATE_DEPOSIT_STARTED). - Reject: session ends with state
10(STATE_ABORTED).
If you reject the session, it will immediately display a general message to the customer that they can’t continue the session. The customer has only the option to close the Brite client.
6. Finalise the customer sign-up
POST [callbacks[session_state=12].url]POST /api/session.get
The approved sessions continue and allow the customer to complete the payment. If the customer chooses to complete the payment Brite will notify you on the assigned session state 12 (STATE_COMPLETED) callback url.
If you choose to use the redirect integration Brite will also redirect the customer to the redirect_uri OR if you choose to use the embedded integration, you have the option to specific further actions in the Brite client for the STATE_COMPLETED event on the front-end.
7. Handle session and transaction callbacks
POST [callbacks[...].url]POST /api/transaction.get
After the customer registration process, you should continue to rely on the transaction notifications as no further session notifications are expected. Here we list those transaction notifications which are most relevant and are the minimum for you to process. We also show a full overview of all states for session and transactions.
These are the typical transaction states for payments handling. Whenever you get a notification we recommend fetching the details from the API before processing the payment.
transaction_state*
|
Transaction state name | What to do? |
|---|---|---|
2
|
STATE_ABORTED
|
Return to the payment selection view. |
3
|
STATE_FAILED
|
Return to the payment selection view. |
4
|
STATE_COMPLETED
|
Confirm the order / purchase to the customer. |
5
|
STATE_CREDIT
|
Ship goods / credit the player. |
7
|
STATE_DEBIT
|
Reach out to the customer to pay again. |
The User authentication API provides a mechanism to identify and authenticate returning customers who have previously interacted with Brite, allowing merchants to log them in or recognise them within their systems seamlessly
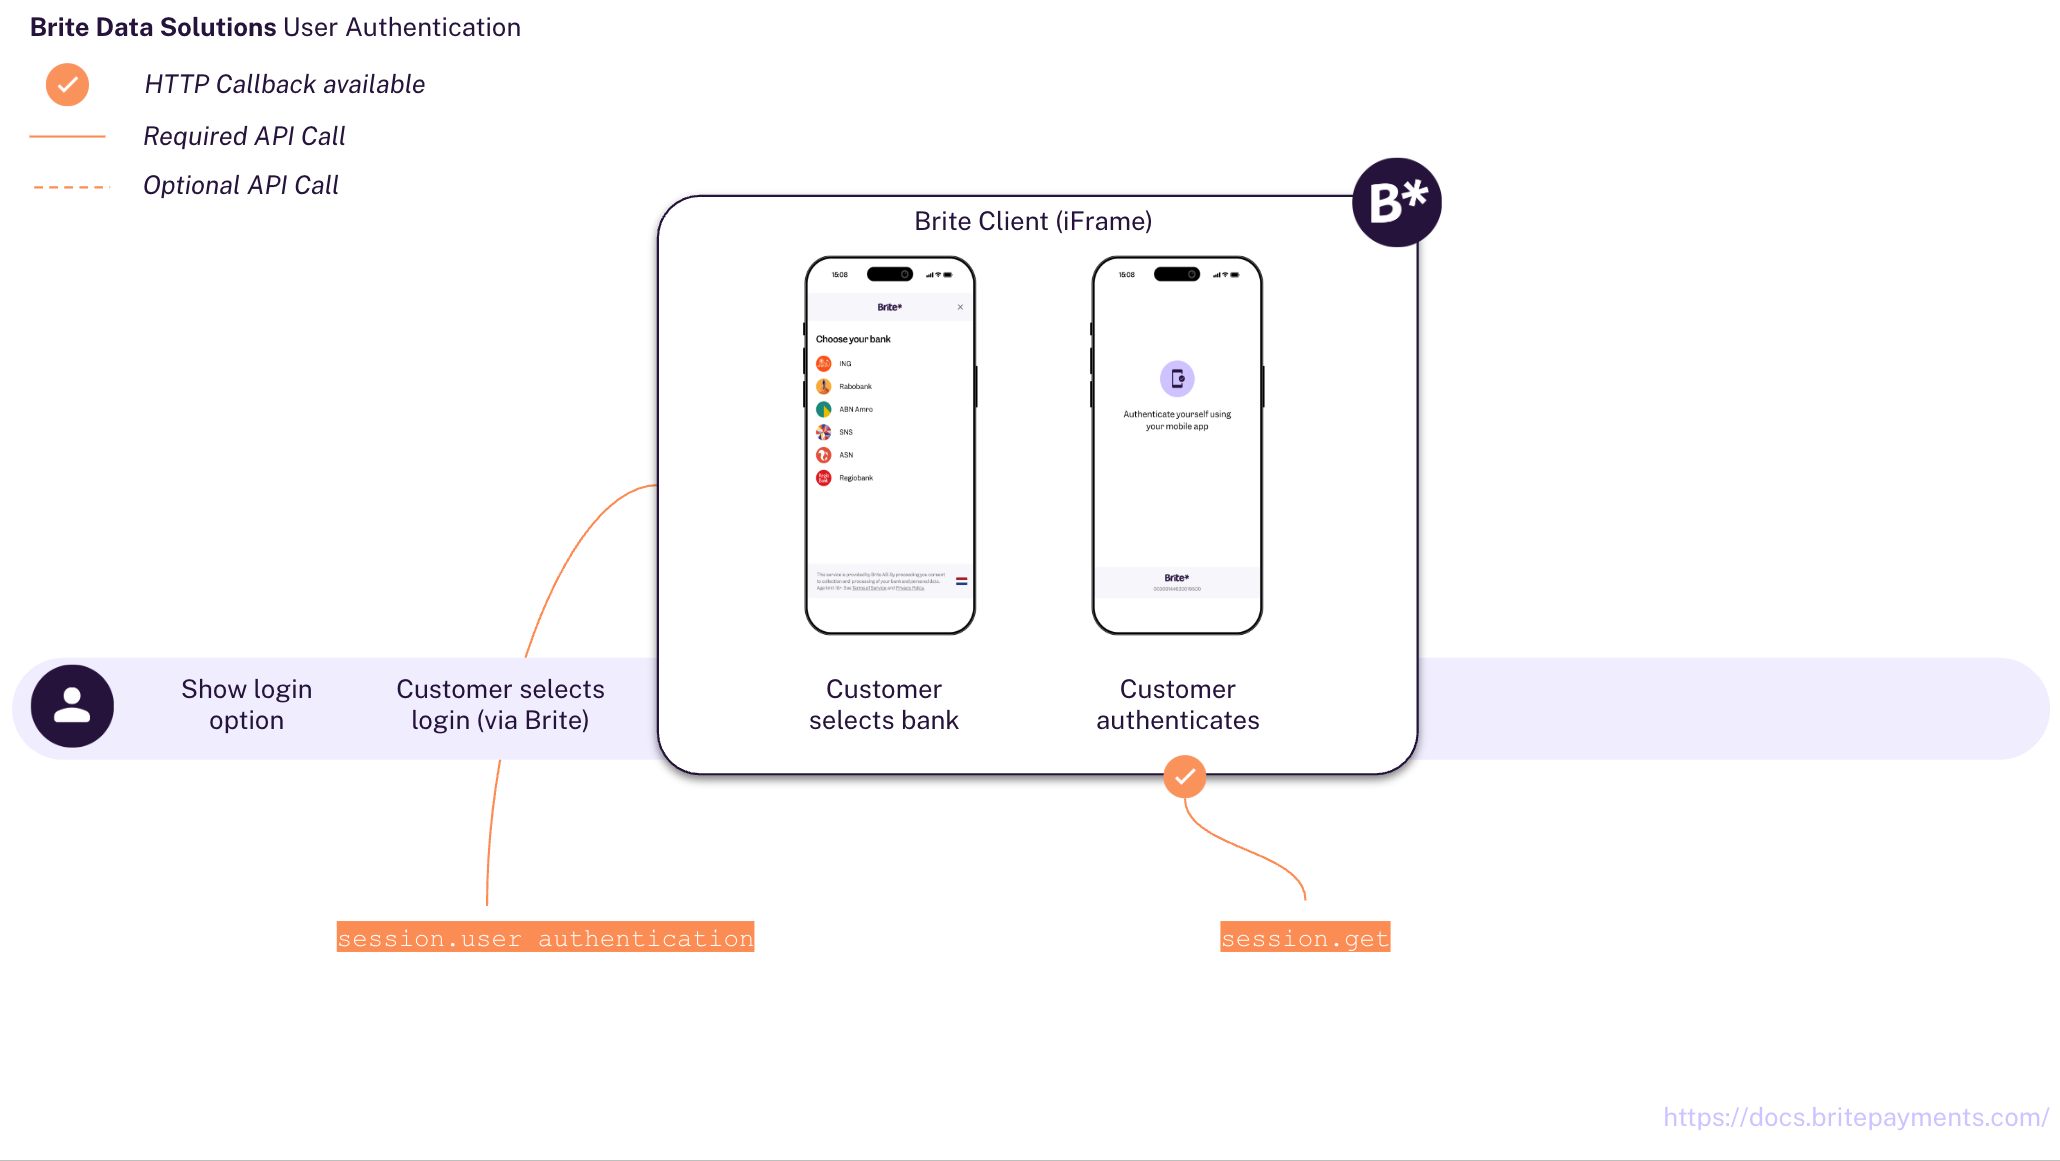
Brite generates a unique customer_id for every user during any Brite session. You can save this customer_id and associate it with a user in your system. Later, you can trigger a Brite authentication session. Brite will then verify the user’s identity and return their customer_id. This enables you to confidently recognise the user and, for example, grant them access to their private account or retrieve associated data.
The integration consists of 5 steps:
Display Brite as an option on your site
GET /v1/assets/Create a session to initiate the authentication session
POST /api/session.create_authenticationRender the Brite Client on the front-end
<script>new Brite([token])</script>
Handle the session webhook
POST [callbacks[…].url]Retrieve the customer_id
POST /api/session.get
Integration Steps
1. Display Brite as an option to authenticate on your website
GET /v1/assets/ 
At first it is important that customers recognise and choose Brite as their way to authenticate on your website. Brite provides assets which make the presentation of Brite as a payment option clear and visually beautiful for your customers!
The best way to do that is to use Brite’s assets API. Find that in more details: https://docs.britepayments.com/checkout-ux-guidelines/automated-asset-deliver/
2. Create a session for Authentication
Merchant authorisation
POST /api/merchant.authorize
You need to authorise your access to Brite's APIs. For that follow the steps outlined in Merchant Authorisation. As a result, you have an access_token which you add to your requests to the Brite APIs.
Authorization: Bearer <access_token>
Request to create a session
POST /api/session.create_authentication
The request includes several data points, not all of which are required. However, we highly recommend adding them as outlined in the sample request here. Providing the data can improve the overall UX for the customer and also your own as it allows you to identify and relate customers better with orders in your system.
					POST /api/session.create_authentication HTTP/1.1
Host: sandbox.britepaymentgroup.com
Content-Type: application/json
Authorization: Bearer <YOUR_ACCESS_TOKEN>
{
  "country_id": "se",
  "brand_name": "My example brand",
  "merchant_reference": "12345-ABC", // Your identifier
  "locale": "sv",
  "deeplink_redirect": "myapp://open?your_id=12345-ABC",
  "callbacks": [
    {
      "url": "https://merchant.com/callback?your_id=12345-ABC",
      "session_state": 10 // STATE_ABORTED to go back to authentication selection
    },
    {
      "url": "https://merchant.com/callback?your_id=12345-ABC",
      "session_state": 11 // STATE_ABORTED to go back to authentication selection
    },
    {
      "url": "https://merchant.com/callback?kyc=true&your_id=12345-ABC",
      "session_state": 12 // STATE_COMPLETED to fetch the customer_id
    }
}
Here we highlight some parameters. For a full list of all parameters check out the API reference.
brand_name
The brand name is visible to the customer when using Brite Payments. You should choose a recognisable and relatable brand name here for a better experience. Note that even though there is no character limitation, Brite will show 31 characters in the smallest version of the client.

deeplink_redirect - recommended for mobile apps
When the customer returns from their mobile banking app or online banking, a Brite web application is opened to handle the returning customer. Note that this is particularly the case on mobile devices. Immediately after that Brite opens the link provided in deeplink_redirect. This way, the customer is basically redirected from their bank to the deeplink_redirect. The link should point to the view in your mobile app or web page on which the customer can continue the payment process using Brite.
You should add any relevant ids to the URL so that you can identify the respective purchase/order in your system.
Example for mobile apps: myapp://open?screen=checkout&order_id=ORD-12345-AB
Example for web pages: https://merchant.com/checkout?order_id=ORD-12345-AB
If you don't provide a deeplink_redirect the Brite web application closes itself without any further redirection. This will likely open the most recent tab or browser of the customer instead of opening the merchant app and feels to the customer as if they get “stuck”. From here, they have to manually retrieve the merchant app from the apps in the background.
callbacks
It is crucial to subscribe to the callbacks to know how to process the deposit in your system. For the standard Brite Play integration you should subscribe to
Session states (session_state):
2=> to verify the customer on your end10and11=> to fetch aborted and failed sessions12=> for successfully completed sessions
Response from create a session request
					{
   "url": "https://sandbox.britepaymentgroup.com/eyJo[...]2M1ODI1ZCJ9",
   "token": "eyJo[...]2M1ODI1ZCJ9",
   "id": "ag9o[...]pb24YstTA5AEM"
}
customer_id once the session is completed.
The response provides attributes for both embedded integrations (token) and hosted integrations (url). However, as noted earlier, redirect integration is not supported for this functionality, so you must not use the url parameter.
For instructions on how to embed the Brite iframe using our SDK, refer to the Embedding the Brite Javascript SDK section.
3. Render the client on the front-end
<script>new Brite([token])</script>
The Brite client will handle all required authentication and authorisation steps the customer needs to go through with their bank. Once those are completed, you will receive an event on the front-end that will close the client and allow you to continue to authentication flow.
For integration of the Brite client see https://docs.britepayments.com/technical-documentation/rendering-the-brite-client/
4. Handle session callbacks notification
After the authentication session concludes—whether successfully, aborted, or failed—Brite sends a POST request to the Callback URL you specified in the initial session request. This webhook notification contains information about the session’s outcome, allowing you to update your system and guide your users appropriately.
Example callback POST request
					User-agent: Brite Callback
Content-Type: application/json

{
  "session_id": "ag9ofmFib25lYS0xNzYyMTNyEQsS[...]5QEM",
  "merchant_id": "ag9ofmFib25lYS0xNB1Nlc3Npb2[...]4Yo4PY",
  "session_state": 12
}
The most important part of this payload is the session_state field, which tells you how the session ended. Here’s how you should handle each possible state:
Session Failure (session_state: 10 or 11)
If the session_state is 10 (failed) or 11 (aborted), it means the user verification process was unsuccessful. In these cases, you should:
- Return the user to the login step in your front end.
- Clearly inform the user that the verification failed and provide options to retry the verification or choose an alternative method for user verification.
Session Success (session_state: 12)
If the session_state is 12 (completed), the user verification was completed successfully. For these cases, you should:
- Trigger a /session.get API call towards Brite to collect the
customer_id.
- Initiate the happy path UX in your front-end. This might involve granting them access to their private account or retrieving associated data.
5. Retrieve the customer_id
Call the session.get endpoint using the session_id from the webhook notification.
The response will include the Brite-generated customer_id.
Example session.get request
					POST /api/session.get HTTP/1.1
Host: sandbox.britepaymentgroup.com
Content-Type: application/json
Authorization: Bearer <YOUR_ACCESS_TOKEN>

{
  "id": "string" // session_id
}
Example session.get response
					{
  "created": 1722535560,
  "country_id": "se",
  "merchant_reference": "Your_ID",
  "state": 12,
  "customer_id": "ag1hYm9uZWEtMjQ5MDE0cg4LE[...]gBDA"
  [...]
}
On this page