Integration
In-depth knowledge
Testing and Go-live
Integrate
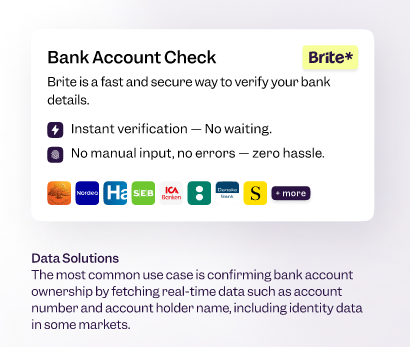
Brite Data Solutions
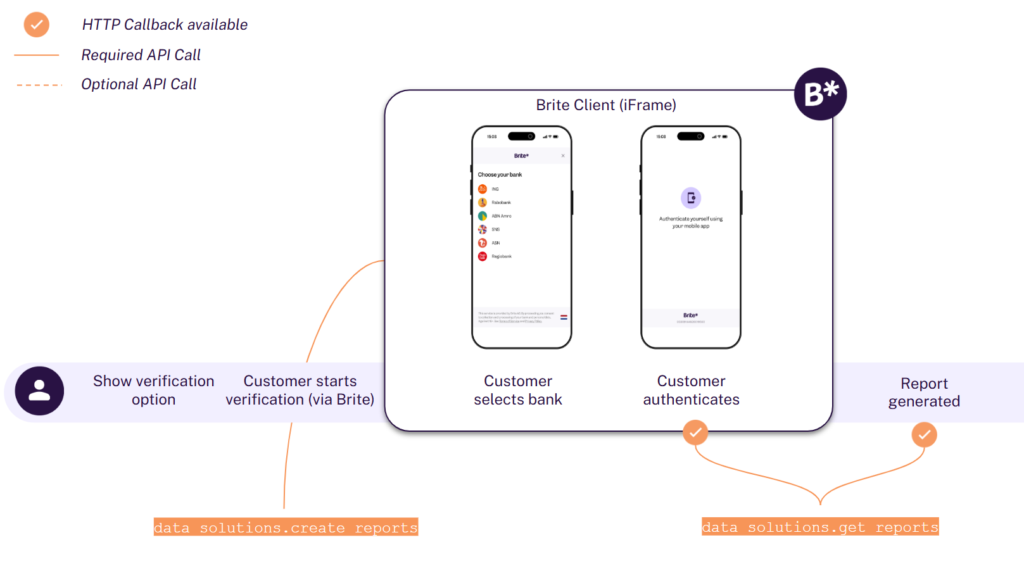
The integration consists of 5 steps,.
- Display Brite as an option on your site
- Create a request for Reports
POST /api/data_solutions.create_reports - Optional: If you use the token render the Brite client on the front-end
<script>new Brite([token])</script> - Handle callback notifications
- Retrieve your Reports
POST /api/data_solutions.get_reports
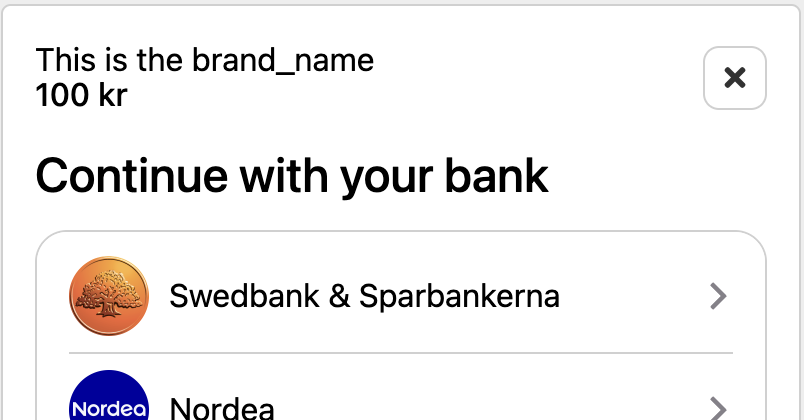
1. Display Brite as an option on your site
2. Create a request for Reports
Request to create Reports
Example:
					POST /api/data_solutions.create_reports
Sandbox: sandbox.britepaymentgroup.com
Production: production.britepaymentgroup.com
Content-Type: application/json
Authorization: Bearer <YOUR_TOKEN>

Request
{
  "report_types": ["ACCOUNT_DETAILS"],
  "country_id": "de",
  "brand_name": "My example brand",
  "merchant_reference": "12345-ABC", // Your identifier
  "locale": "de",
  "redirect_uri": "https://merchant.com/bank_account_verification?your_id=12345-ABC",
  "deeplink_redirect": "myapp://open?your_id=12345-ABC",
  "callbacks": [
    {
      "url": "https://merchant.com/callback?your_id=12345-ABC",
      "report_state": "SESSION_ABORTED"
    },
    {
      "url": "https://merchant.com/callback?your_id=12345-ABC",
      "report_state": "SESSION_FAILED"
    },
    {
      "url": "https://merchant.com/callback?kyc=true&your_id=12345-ABC",  //optional
      "report_state": "SESSION_COMPLETED" //optional
    },
    {
      "url": "https://merchant.com/callback?kyc=true&your_id=12345-ABC",
      "report_state": "REPORT_GENERATED"
    }
  ]
}
brand_name
The brand name is visible to the customer when using Brite. You should choose a recognisable and relatable brand name here for a better experience. Note that even though there is no character limitation, Brite will show 31 characters in the smallest version of the client.
redirect_uri
Only for redirection when the session completes, aborts or in other ways finishes. Brite opens the link provided in redirect_uri. If you use Brite via the hosted integration. Brite opens the link once the session finishes. That is when
- The customer completes the session. (report_state: SESSION_COMPLETED)
- The session fails for unknown reasons. (report_state: SESSION_ABORTED)
- The session fails for a known reason. (report_state: SESSION_FAILED)
deeplink_redirect – recommended for mobile apps
When the customer returns from their mobile banking app, a Brite web application is opened to handle the returning customer. Note that this is particularly the case on mobile devices. Immediately after that Brite opens the link provided in deeplink_redirect. This way, the customer is basically redirected from their bank to the deeplink_redirect. The link should point to the view in your mobile app or web page on which the customer can continue the session process using Brite.
callbacks
It is crucial that you register the session callback to know how the session is progressing. You can register the session states: SESSION_COMPLETED, REPORT_GENERATED, SESSION_ABORTED, SESSION_FAILED. Configure your next actions after you receive these states from Brite.
Response from create a session request
					{
  "report_id": "ag9ofmFib25lYS0yNTU2MDlyEwsSBlJ",
  "token": "eyJob3N0IjogImh0dH5icml0ZXBheW1lbnRncm91cC"
  "url": "https://sandbox.britepaymentgroup.com/eyJob3N0IjogImh0dH5icml0ZXBheW1lbnRncm91cC"
}
The URL opens the Brite’s hosted bank session page. It allows your customers to authenticate themselves towards their bank which lets Brite fetch the data that is needed. We call this the redirect integration. At the end of the flow, Brite redirects the customer back to the URL you provided in the redirect_uri. Continue the integration by handling the session callbacks that are described later in this document.
token
The token is to initiate the Brite client in your checkout. It should be securely shared with the client. This allows your customers to complete the Account Information product session as an embedded experience. We call this the embedded integration. This should be the recommended approach.
You can learn more about how to set this up in this link.
report_id is the unique identifier of the Account Information report of the user. Store the report_id you can retrieve the report once the session has been completed. 3. If you use the token render the Brite client on the front-end
					<script>
  var client = new Brite("token")
  [...]
<script>
The Brite client will handle all required authentication and authorisation steps the customer needs to go through with their bank. Once those are completed, you will receive an event on the front-end and the Brite client will close itself.
You can learn more about integrating with the Brite client here.
Embedded integration (Recommended)
The embedded integration allows your customers to complete the session within your site.
In some cases, they might need to complete certain steps such as authentication and authorisation in their online banking. However, they will get back to your site before completing the payment.
Redirect integration
The redirect integration allows you to redirect the customer to a Brite-hosted page.
The customer completes all required steps there until the session is aborted, failed or completed. At the end of the flow, Brite redirects the customer back to the URL you provided in the redirect_uri.
4.Handle callback notifications
After a Brite session concludes—whether successfully, aborted, or failed—Brite sends a POST request to the callback_URL you specified in the initial session request. This request contains information about the session’s outcome, allowing you to update your system and guide your users appropriately.
Please read and follow the instructions on how to work with callbacks on our callback handling page.
Example output:
					user-agent: Brite callback
content-type: Application/json

{
  "report_id": "ag9ofmFib25lYS0yNTU2MDlyEwsSBlJ",
  "merchant_id": "ag9ofmFib25lYS0xNB1Nlc3Npb2[...]4Yo4PY",
  "report_state": "SESSION_COMPLETED"
}
report_state field, which tells you how the session ended. Here’s how you should handle each possible state:
Session Failure
If the report_state is SESSION_ABORTED or SESSION_FAILED, it means that the bank verification process was unsuccessful. In such cases you can:
- Return the user to the bank verification step in your front end.
- Clearly inform the user that you were unable to fetch the account information and provide options to retry the bank account verification process.
Session Success
When the report_state is SESSION_COMPLETED, this signifies that the end user has completed the bank verification step. Brite now has the access to fetch the needed data from the customers bank account in the background to prepare the report.
Report generated
When the report state reaches REPORT_GENERATED, this means that the report is available for you to fetch the report through the get_reports endpoint. Brite calls the url that you have defined for this state. You can now trigger a /api/data_solutions.get_reports call towards Brite to collect the report.
5. Retrieve your Reports
/api/data_solutions.get_reports endpoint using the report_id. Example output:
					POST /api/data_solutions.get_reports
Sandbox: sandbox.britepaymentgroup.com
Production: production.britepaymentgroup.com
Content-Type: application/json
Authorization: Bearer <YOUR_TOKEN>

Request
{
  "report_id": "ag9ofmFib25lYS0yNTU2MDlyEwsSBlJ"
}

Response
{
  "created_at": "2023-11-16T18:51:46.352Z",
  "account_details": {
     "type": "CURRENT" | "SAVINGS" | "JOINT_ACCOUNT" | "CREDIT_CARD" | "BUSINESS" | "OTHER",
     "holder": {
                 "name": "Anna Svensson",
                },

        "iban":"SE4550000000012345678912" | none,
        "bban": {
            clearing_number: "1234",
            bank_account_number: "5678912"
        } | none,
        bic: "MONZGB26" | none,
        bank_name: "SEB" | none,
        currency: "SEK" | none,
        country: "SE" | none,
    },

}
Here’s an example of a 400 error when you fetch a report too early
					POST /api/data_solutions.get_reports
Sandbox: sandbox.britepaymentgroup.com
Production: production.britepaymentgroup.com
Content-Type: application/json
Authorization: Bearer <YOUR_TOKEN>

Request
{
  "report_id": "ag9ofmFib25lYS0yNTU2MDlyEwsSBlJ"
}

Response
{
  "state": "APPLICATION_ERROR",
  "error_message": "Report is not ready yet",
  "error_name": "TooEarly"
}
The integration consists of 5 steps:
- Display Brite as an option on your site
- Create a request for Reports
POST /api/data_solutions.create_reports - Optional: If you use the token render the Brite client on the front-end
<script>new Brite([token])</script> - Handle callback notifications
- Retrieve your Reports
POST /api/data_solutions.get_reports
1. Display Brite as an option on your site
At first, customers must recognize and choose Brite as a way to provide their Affordability to you. Brite provides assets which makes the presentation of the Affordability product clear and visually appealing to your customers.
2. Create a request for Reports
Request to create Reports
Example:
					POST /api/data_solutions.create_reports
Sandbox: sandbox.britepaymentgroup.com
Production: production.britepaymentgroup.com
Content-Type: application/json
Authorization: Bearer <YOUR_TOKEN>

Request

{
  "report_types": ["ACCOUNT_DETAILS", "AFFORDABILITY"],
  "country_id": "de",
  "brand_name": "My example brand",
  "merchant_reference": "12345-ABC", // Your identifier
  "locale": "de",
  "redirect_uri": "https://merchant.com/bank_account_verification?your_id=12345-ABC",
  "deeplink_redirect": "myapp://open?your_id=12345-ABC",
  "callbacks": [
    {
      "url": "https://merchant.com/callback?your_id=12345-ABC",
      "report_state": "SESSION_ABORTED"
    },
    {
      "url": "https://merchant.com/callback?your_id=12345-ABC",
      "report_state": "SESSION_FAILED"
    },
    {
      "url": "https://merchant.com/callback?kyc=true&your_id=12345-ABC",
      "report_state": "SESSION_COMPLETED"
    },
    {
      "url": "https://merchant.com/callback?kyc=true&your_id=12345-ABC",
      "report_state": "REPORT_GENERATED"
    }
  ]
}
brand_name
The brand name is visible to the customer when using Brite. You should choose a recognisable and relatable brand name here for a better experience. Note that even though there is no character limitation, Brite will show 31 characters in the smallest version of the client.
redirect_uri
Only for redirection when the session completes, aborts or in other ways finishes. Brite opens the link provided in redirect_uri. If you use Brite via the hosted integration. Brite opens the link once the session finishes. That is when
- The customer completes the session. (report_state: SESSION_COMPLETED)
- The session fails for unknown reasons. (report_state: SESSION_ABORTED)
- The session fails for a known reason. (report_state: SESSION_FAILED)
deeplink_redirect – recommended for mobile apps
When the customer returns from their mobile banking app, a Brite web application is opened to handle the returning customer. Note that this is particularly the case on mobile devices. Immediately after that Brite opens the link provided in deeplink_redirect. This way, the customer is basically redirected from their bank to the deeplink_redirect. The link should point to the view in your mobile app or web page on which the customer can continue the session process using Brite.
callbacks
It is crucial that you register the session callback to know how the session is progressing. You can register the session states: SESSION_COMPLETED, REPORT_GENERATED, SESSION_ABORTED, SESSION_FAILED. Configure your next actions after you receive these states from Brite.
Response
					{
  "report_id": "ag9ofmFib25lYS0yNTU2MDlyEwsSBlJ",
  "token": "eyJob3N0IjogImh0dH5icml0ZXBheW1lbnRncm91cC"
  "url": "https://sandbox.britepaymentgroup.com/eyJob3N0IjogImh0dH5icml0ZXBheW1lbnRncm91cC"
}
token
The token is to initiate the Brite client in your checkout. It should be securely shared with the client. This allows your customers to complete the Affordability product session as an embedded experience. We call this the embedded integration. This should be the recommended approach.
You can learn more about how to set this up in this link.
report_id is the unique identifier of the Affordability report of the user. Store the report_id you can retrieve the report once the session has been completed.
3. If you use the token render the Brite client on the front-end
					<script>
  var client = new Brite("token")
  [...]
<script>
The Brite client will handle all required authentication and authorisation steps the customer needs to go through with their bank. Once those are completed, you will receive an event on the front-end and the Brite client will close itself.
You can learn more about integrating with the Brite client here.
Embedded integration (Recommended)
The embedded integration allows your customers to complete the session within your site.
In some cases, they might need to complete certain steps such as authentication and authorisation in their online banking. However, they will get back to your site before completing the payment.
Redirect integration
The redirect integration allows you to redirect the customer to a Brite-hosted page.
The customer completes all required steps there until the session is aborted, failed or completed. At the end of the flow, Brite redirects the customer back to the URL you provided in the redirect_uri.
4.Handle callback notifications
After a Brite session concludes—whether successfully, aborted, or failed—Brite sends a POST request to the callback_URL you specified in the initial session request. This request contains information about the session’s outcome, allowing you to update your system and guide your users appropriately.
Example output:
					user-agent: Brite callback
content-type: Application/json

{
  "report_id": "ag9ofmFib25lYS0yNTU2MDlyEwsSBlJ",
  "merchant_id": "ag9ofmFib25lYS0xNB1Nlc3Npb2[...]4Yo4PY",
  "report_state": "SESSION_COMPLETED"
}
report_state field, which tells you how the session ended. Here’s how you should handle each possible state:
Session Failure
If the report_state is SESSION_ABORTED or SESSION_FAILED, it means that the bank verification process was unsuccessful. In such cases you can:
- Return the user to the bank verification step in your front end.
- Clearly inform the user that you were unable to fetch Affordability and provide options to retry the bank account verification process.
Session Success
When the report_state is SESSION_COMPLETED, this signifies that the end user has completed the bank verification step. Brite now has the access to fetch the needed data from the customers bank account in the background to prepare theAffordability report.
Report generated
When the report state reaches REPORT_GENERATED, this means that the Affordability report is available for you to fetch the report through the get_reports endpoint. Brite calls the url that you have defined for this state. You can now trigger a /api/data_solutions.get_reports call towards Brite to collect the users Affordability report.
5. Retrieve your Reports
Here’s how to retrieve the users Affordability Report after a successful session:
Get the Affordability report: Call the /api/data_solutions.get_reports endpoint using the report_id.
Example output:
					POST /api/data_solutions.get_reports
Sandbox: sandbox.britepaymentgroup.com
Production: production.britepaymentgroup.com
Content-Type: application/json
Authorization: Bearer <YOUR_TOKEN>

Request
{
  "report_id": "ag9ofmFib25lYS0yNTU2MDlyEwsSBlJ"
}

Response
{
  "created_at": "2023-11-16T18:51:46.352Z",
  "account_details": {
     "type": "CURRENT" | "SAVINGS" | "JOINT_ACCOUNT" | "CREDIT_CARD" | "BUSINESS" | "OTHER",
     "holder": {
                 "name": "Anna Svensson",
                },

        "iban":"SE4550000000012345678912" | none,
        "bban": {
            clearing_number: "1234",
            bank_account_number: "5678912"
        } | none,
        bic: "MONZGB26" | none,
        bank_name: "SEB" | none,
        currency: "SEK" | none,
        country: "SE" | none,
    },

     affordability: {
      income_stream_found: boolean,
      fixed_expenses_found: boolean,

      statistics: {
          median_monthly_income:
          average_monthly_income:
          average_balance_start_of_month:
          median_monthly_fixed_expenses:
          average_monthly_fixed_expenses:
          median_net_disposable_income:
          average_net_disposable_income:
      }

      income_streams: [
        {
          count: 3,
          frequency: '"ONE-TIME" | "RECURRING"',
          ids: ["A1111", "A2222", "A3333"]
          categories:[
            '"SALARY"',
          ],
          counterparty: {
             name: "Some company AB",
             account: {
               iban: "FI4550000000012345678912",
               bban: "12345678912",
               other_identifier: [
                 {
                    identifier_type: "some_other_national_system_account_itype",
                    identifier_value: "123123AABB"
                 }
               ],
            }
          },
          references: ["lon"]
          amount: {
            all: [2_000, 2_000, 5_000],
            monthly_average: 3_000,
            monthly_median: 2_000,
            total: 8000
          },
        },
      ],

      fixed_expenses_insights: [
        {
        categories: [
          "DEBT" | "DEBT_COLLECTION" | "HOUSING" | "UTILITIES" | "TRANSPORT" | "GROCERIES" | "OTHER",
        ],
        count: 3,
        ids: ["B4444", "B5555", "B6666"],
        counterparty: {
          name: "Some company AB",
          account_identifier: "1234567890",
        },
        amount: {
          all: [2_000, 2_000, 5_000],
          average: 3_000,
          median: 2_000,
        },
      },
      {
        categories: ["TRANSPORT", "DEBT"],
        count: 3,
        ids: ["C8888", "C9999", "C0000"],
        counterparty: {
          name: "Volvo AB",
          account_identifier: "1234567890",
        },
        references: ["volvo loan jan", "volvo loan feb", "volvo loan mar"]
        amount: {
          all: [2_000, 2_000, 5_000],
          average: 3_000,
          median: 2_000,
        },
      },
      {
        categories: ["TRANSPORT"],
        count: 3,
        ids: ["D1111", "D2222", "D3333"],
        counterparty: {
           name: "Some company AB",
           account: {
              iban: "FI4550000000012345678912",
              bban: "12345678912",
              other_identifier: [
                {
                   identifier_type: "some_other_national_system_account_itype",
                   identifier_value: "123123AABB"
                }
              ],
           }
        },
        unique_references: ["volvo service jan", "volvo tires feb", "volvo upgrade mar", "1030654225024/PP.1400.PP/. Volvo, Ihr Einkauf bei Volvo"]
        amount: {
          all: [1_000, 1_000, 1_000],
          average: 1_000,
          median: 1_000,
          total: 3_000
        },
      }
      pdf: "https://somelink.com/report.pdf",
    },
  }


}
Here’s an example of a 400 error when you fetch a report too early
					POST /api/data_solutions.get_reports
Sandbox: sandbox.britepaymentgroup.com
Production: production.britepaymentgroup.com
Content-Type: application/json
Authorization: Bearer <YOUR_TOKEN>

Request
{
  "report_id": "ag9ofmFib25lYS0yNTU2MDlyEwsSBlJ"
}

Response
{
  "state": "APPLICATION_ERROR",
  "error_message": "Report is not ready yet",
  "error_name": "TooEarly"
}
The integration consists of 5 steps,.
- Display Brite as an option on your site
- Create a request for Reports
POST /api/data_solutions.create_reports - Optional: If you use the token render the Brite client on the front-end
<script>new Brite([token])</script> - Handle callback notifications
- Retrieve your Reports
POST /api/data_solutions.get_reports
1. Display Brite as an option on your site
At first, customers must recognize and choose Brite as a way to provide their source of funds to you. Brite provides assets which makes the presentation of the Source of Funds product clear and visually appealing to your customers.
2. Create a request for Reports
Request to create Reports
Example:
					POST /api/data_solutions.create_reports
Sandbox: sandbox.britepaymentgroup.com
Production: production.britepaymentgroup.com
Content-Type: application/json
Authorization: Bearer <YOUR_TOKEN>

Request

{
  "report_types": ["ACCOUNT_DETAILS", "SOURCE_OF_FUNDS"],
  "country_id": "de",
  "brand_name": "My example brand",
  "merchant_reference": "12345-ABC", // Your identifier
  "locale": "de",
  "redirect_uri": "https://merchant.com/bank_account_verification?your_id=12345-ABC",
  "deeplink_redirect": "myapp://open?your_id=12345-ABC",
  "callbacks": [
    {
      "url": "https://merchant.com/callback?your_id=12345-ABC",
      "report_state": "SESSION_ABORTED"
    },
    {
      "url": "https://merchant.com/callback?your_id=12345-ABC",
      "report_state": "SESSION_FAILED"
    },
    {
      "url": "https://merchant.com/callback?kyc=true&your_id=12345-ABC",
      "report_state": "SESSION_COMPLETED"
    },
    {
      "url": "https://merchant.com/callback?kyc=true&your_id=12345-ABC",
      "report_state": "REPORT_GENERATED"
    }
  ]
}
brand_name
The brand name is visible to the customer when using Brite. You should choose a recognisable and relatable brand name here for a better experience. Note that even though there is no character limitation, Brite will show 31 characters in the smallest version of the client.
redirect_uri
Only for redirection when the session completes, aborts or in other ways finishes. Brite opens the link provided in redirect_uri. If you use Brite via the hosted integration. Brite opens the link once the session finishes. That is when
- The customer completes the session. (report_state: SESSION_COMPLETED)
- The session fails for unknown reasons. (report_state: SESSION_ABORTED)
- The session fails for a known reason. (report_state: SESSION_FAILED)
deeplink_redirect – recommended for mobile apps
When the customer returns from their mobile banking app, a Brite web application is opened to handle the returning customer. Note that this is particularly the case on mobile devices. Immediately after that Brite opens the link provided in deeplink_redirect. This way, the customer is basically redirected from their bank to the deeplink_redirect. The link should point to the view in your mobile app or web page on which the customer can continue the session process using Brite.
callbacks
It is crucial that you register the session callback to know how the session is progressing. You can register the session states: SESSION_COMPLETED, REPORT_GENERATED, SESSION_ABORTED, SESSION_FAILED. Configure your next actions after you receive these states from Brite.
Response
					{
  "report_id": "ag9ofmFib25lYS0yNTU2MDlyEwsSBlJ",
  "token": "eyJob3N0IjogImh0dH5icml0ZXBheW1lbnRncm91cC"
  "url": "https://sandbox.britepaymentgroup.com/eyJob3N0IjogImh0dH5icml0ZXBheW1lbnRncm91cC"
}
The URL opens the Brite’s hosted bank session page. It allows your customers to authenticate themselves towards their bank which lets Brite fetch the data that is needed. We call this the redirect integration. At the end of the flow, Brite redirects the customer back to the URL you provided in the redirect_uri. Continue the integration by handling the session callbacks that are described later in this document.
token
The token is to initiate the Brite client in your checkout. It should be securely shared with the client. This allows your customers to complete the Source of Funds product session as an embedded experience. We call this the embedded integration. This should be the recommended approach.
You can learn more about how to set this up in this link.
report_id is the unique identifier of the Source of Funds report of the user. Store the report_id you can retrieve the report once the session has been completed.
3. If you use the token render the Brite client on the front-end
					<script>
  var client = new Brite("token")
  [...]
<script>
The Brite client will handle all required authentication and authorisation steps the customer needs to go through with their bank. Once those are completed, you will receive an event on the front-end and the Brite client will close itself.
You can learn more about integrating with the Brite client here.
Embedded integration (Recommended)
The embedded integration allows your customers to complete the session within your site.
In some cases, they might need to complete certain steps such as authentication and authorisation in their online banking. However, they will get back to your site before completing the payment.
Redirect integration
The redirect integration allows you to redirect the customer to a Brite-hosted page.
The customer completes all required steps there until the session is aborted, failed or completed. At the end of the flow, Brite redirects the customer back to the URL you provided in the redirect_uri.
4.Handle callback notifications
After a Brite session concludes—whether successfully, aborted, or failed—Brite sends a POST request to the callback_URL you specified in the initial session request. This request contains information about the session’s outcome, allowing you to update your system and guide your users appropriately.
Please read and follow the instructions on how to work with callbacks on our callback handling page.
Example output:
					user-agent: Brite callback
content-type: Application/json

{
  "report_id": "ag9ofmFib25lYS0yNTU2MDlyEwsSBlJ",
  "merchant_id": "ag9ofmFib25lYS0xNB1Nlc3Npb2[...]4Yo4PY",
  "report_state": "SESSION_COMPLETED"
}
report_state field, which tells you how the session ended. Here’s how you should handle each possible state:
Session Failure
If the report_state is SESSION_ABORTED or SESSION_FAILED, it means that the bank verification process was unsuccessful. In such cases you can:
- Return the user to the bank verification step in your front end.
- Clearly inform the user that you were unable to fetch Source of Funds and provide options to retry the bank account verification process.
Session Success
When the report_state is SESSION_COMPLETED, this signifies that the end user has completed the bank verification step. Brite now has the access to fetch the needed data from the customers bank account in the background to prepare the Source of Funds report.
Report generated
When the report state reaches REPORT_GENERATED, this means that the Source of Funds report is available for you to fetch the report through the get_reports endpoint. Brite calls the url that you have defined for this state. You can now trigger a /api/data_solutions.get_reports call towards Brite to collect the users Source of Funds report.
5. Retrieve your Reports
Here’s how to retrieve the users Source of Funds Report after a successful session:
Get the Source of Funds report: Call the /api/data_solutions.get_reports endpoint using the report_id.
Example output:
					POST /api/data_solutions.get_reports
Sandbox: sandbox.britepaymentgroup.com
Production: production.britepaymentgroup.com
Content-Type: application/json
Authorization: Bearer <YOUR_TOKEN>

Request
{
  "report_id": "ag9ofmFib25lYS0yNTU2MDlyEwsSBlJ"
}

Response
{
  "created_at": "2023-11-16T18:51:46.352Z",
  "account_details": {
     "type": "CURRENT" | "SAVINGS" | "JOINT_ACCOUNT" | "CREDIT_CARD" | "BUSINESS" | "OTHER",
     "holder": {
                 "name": "Anna Svensson",
                },

        "iban":"SE4550000000012345678912" | none,
        "bban": {
            clearing_number: "1234",
            bank_account_number: "5678912"
        } | none,
        bic: "MONZGB26" | none,
        bank_name: "SEB" | none,
        currency: "SEK" | none,
        country: "SE" | none,
    },

    source_of_funds: {
    	    income_streams_found: True,

   	    from_date: 2025-01-01,
   	    to_date: 2025-01-01,
    	    number_of_income_transactions: 3,

    income_streams: [
      {
        count: 3,
        from_date:
        to_date:
        ids: [11111,22222,33333]
        category:
          '"SALARY" | "PENSION" | "BENEFITS" | "OTHER_INCOME" | "NOT_INCOME"',
        counterparty: {
          name: "Some company AB",
          account: {
            iban: "FI4550000000012345678912",
            bban: "12345678912",
            other_identifier: [
              {
                  identifier_type: "some_other_national_system_account_itype",
                  identifier_value: "123123AABB"
              }
            ],
          }
        },
        references: [],
        amounts: {
            all: [1000, 2000, 3000]
            monthly_average: 3000,
            monthly_median: 2000,
            total: 6000,
        },
      },
    ],
    pdf: "https://somelink.com/report.pdf",
  },
};

}
Here’s an example of a 400 error when you fetch a report too early
					POST /api/data_solutions.get_reports
Sandbox: sandbox.britepaymentgroup.com
Production: production.britepaymentgroup.com
Content-Type: application/json
Authorization: Bearer <YOUR_TOKEN>

Request
{
  "report_id": "ag9ofmFib25lYS0yNTU2MDlyEwsSBlJ"
}

Response
{
  "state": "APPLICATION_ERROR",
  "error_message": "Report is not ready yet",
  "error_name": "TooEarly"
}